I want to share with you how I used Alison Glass embroidery transfers to build a design to use in the center of one of my Kwik Sparklers EPP blocks using Sulky Stick’n Stitch product.
As soon as I saw Alison’s iron on transfers I knew I would want to use them more than once.
I was introduced to Stick’n Stitch at Fall Market when Sulky’s educational instructor, Kelly Nagel, was sitting next to me on Demo Alley. I have long been a fan of Sulky Blendables for quilting, because I love how it changes colors but I was unfamiliar with this product. It is a product that you can print your embroidery design on and when you are done stitching, you run your piece under cold water and it will completely wash away.... no worries about stitching over every line in your design because it is there permanently and no tracing the image with a water soluble pen that keeps reappearing after you THOUGHT you washed it all away.
I scanned Alison’s design into my computer as a PDF. (Remember: Do not share patterns with your friends, this is for your personal use only.)
Since Alison’s designs are printed as a transfer, the image is reversed. It does not need to be reversed for the Stick’n Stitch, so I needed to reverse the image in my computer. I used Alison's Road Trip designs, because I am using her new fabric line by Andover Fabrics
Note that I am NOT a computer person, I am a quilter, so there may be an easier way to do this. I also have a Mac... I was proud of myself for actually achieving what I wanted.
select the PNG file and open it.
Save it and you now have things facing the correct way.
Now, it is time to play....I printed one copy to play with the designs and see which designs would fit in the space I had.
I chose this one because it was a perfect “V” shaped design that fit like it was made to go there.
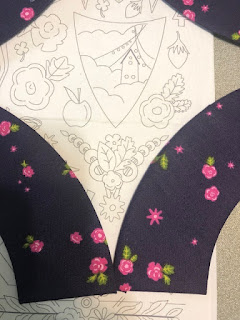
Since there was only one per page I printed 3 more copies. The idea was to combine them to create the shape I needed - I traced the arc pieces and taped the designs in place.
I checked again to make sure it would look right. My Sparkler logo fits perfectly in the center, so of course it needed to go there. I could have also selected any other design Alison offers as well. Shrink or enlarge any image on your copier to fit the space you want. This is my new English Paper Piecing Pattern Kwik Sparklers
Once you have created a design you like, put in a sheet of Stick’nStitch in the paper tray and copy the image you built.
Now you are ready to Stick’n Stitch away. I am using a piece of Alison Glass Insignia 2018 and I centered the very center over one of the designs! Now it is time to start embroidering with my Sulky 12 wt Petites


